Sleepy Hollow

Sleepy Hollow

Monday, 12 March 2012

Scaffold down and bricks cleaned

Here are the lights we have chosen for the walls outside the doors.   We've got 6 of them.  They ended up being an unexpected bargain from Bunnings.  They were on display as $56 each, so we were expecting to be out of pocket over $300, but when I got to the checkout, they had been marked down on special at only $24 each, so less than half price.  Brilliant!

Neil's holding one against the wall here, so we can show the electrician how high up we want them.   Need to remember that there will be 100mm of concrete for the verandah floor to be poured yet.


The pantry shelves are in.  This gives us more than double the pantry shelf area of the current kitchen.  That's without including the shelves on the left.  The shelves on the right are about 3 metres long and set at heights of 40cm intervals.  The vertical support in the second picture is about halfway along the shelves.  Can't show them properly because the entrance to the pantry is beside the fridge alcove; the pantry goes in around behind the fridge, but take my word for it, they look great.
We will need a ladder to get to the top ones.  I want to get one that slides along a fixed rail.  They are called library ladders.  That will have to wait though.
The bottom 2 shelves are 45cm deep, for larger trays and appliances.  The upper shelves are all 30cm deep.  These are the perfect depth for my Tupperware modular mates super ovals, rectangles and veg outs.
On the left, the bottom shelf is 1 metre above the floor and there is a double power point on the wall, so it can be used as a mini work bench.  We've also put an exhaust fan in the pantry ceiling, so we can have things on the go in here, out of the way.  Originally, it was going to be the full on butler's pantry with it's own sink in the left corner, but we ended up deciding that a sink would take up too much of the bench space.  I'm sure we'll survive.
Looking at the first picture, I think we could also put shelves on the end wall to connect up the top 3 on both sides.  If we ever were to run out of space.


The stairs are in.  There's a sheet of masonite on each tread to protect them while the painting is being done.  These will be stained to match the bamboo flooring that we're having downstairs.


The last of the verandah frame looks to be finished and the guttering is on.  The roof tilers will need to come back to finish that off next.  Neil still thinks that the point on the roof needs something to finish it off properly.  Google, here I come.  If you look closely, you might be able to see that the balcony doors are the right ones now with the micro venetian blinds in them.


The scaffold is down now so there wont be much left to add to this photo for this side of the house to be finished.  We'll need the verandah roof finished off, verandah floor concrete poured, that's not the final door yet, downstairs window frames still need to be stained and sealed, a spotlight will be installed on the right corner of the building, the hot water service will be installed on the right end outside the ensuite and an outside tap will be attached under the toilet window.  OK, so a few things still left to do, but it wont look that much different to this.  And if I find something groovy to add to the roof point....

Sunday, 19 February 2012

Brickwork finished, but not cleaned yet

Wow.  It's been a little while since I posted an update.  I didn't have my camera with me the last time I went up there and the insulation was pretty much all in the walls.  Today we went up and most of the plaster board is up. It's really coming along at a cracking pace now.
This photo shows the stairwell on the left, waiting for the arrival of the stairs.  On the right is the passageway to the lounge room doorway (right), downstairs toilet (straight ahead) and master bedroom (opposite lounge room doorway)

Looking back the other way, you see the double doorway to the family room with the hole over the doorway.    I was wanting to put some transom windows in here, but Neil thinks it looks like a great place to put some of his trophies.  Hmmm.

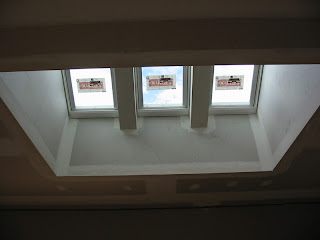
Here are the skylights over the kitchen/dining room.


Here's the start of the verandah lining.


This was the last bit to be finished upstairs.


And finally my standard update shot.

Wednesday, 25 January 2012

Upstairs roof neeeeearly finished

We went up on Monday after work to meet the electrician and discuss locations of power points, light fittings etc. for the electrical rough-in.  The upstairs roof is nearly finished: just a little bit more to do on the very top.  The tilers don't want anyone else on site while they're doing their thing, so the electrician said he wont be able to start until next week.  We've got a couple of things to chase up for him anyway.  The bricklayer has done almost as much as he can do until they take the scaffold down, then it's full steam ahead for the upstairs brick walls.  Woo Hoo!


The downstairs guttering is done for most of the verandah that's there so far.


Sunday, 15 January 2012

Upstairs gutters and fascia are on

Well, the downstairs brickwork is still going, but I was surprised to see the scaffolding on for the upstairs roof and the upstairs guttering and fascia went up on Friday, I've been told.  We've done the house gutters and fascia the same colour as the gutters, roller doors and down pipes on the shed - "woodland grey".  It looks like it will go with the brick colour quite well.  One of the Boral colour scheme pamphlets had "woodland grey" with "gun metal" (the colour we're doing the roof tiles) and "cream" (the window frames).

Although the window frames haven't been painted yet and if you look at the Dulux colours for the cream colour we've picked, it is actually listed as one of the whites.  It's called "Sarah's Place".  I kid you not.  Neil thinks that's the only reason I picked it out, but I can honestly say I've got 21 Dulux colour sample swatches and it is the one I prefer of all of them.  The closest thing to it was Chalk USA, which is slightly more beige, in my opinion.  I painted a picture frame which is roughly the width of the window frames and we went down to the Boral display centre in Wantirna to see it against the bricks, so Neil could get an idea of what it would look like.  Neil agreed with me that it was a good colour for the window frames.  Yay!  Any win is a good win.  But now that I've suggested Scallywag Quarter for the inside wall colour, he totally thinks I'm just going off names.  It's so close to Hog Bristle Quarter, it's not funny.  I bought a piece of plaster board and some sample pots so I can paint them up and get a proper idea of the colours.  I'm guessing I'm going to be pushing for Scallywag.  It would just be too awesome if it's perfect.

Anyway, here's the house with the upstairs gutter on, with pre-painted window frames.  You can see the finished shed in the background.  Oh and the laundry window is in now.  Yep, some bricks had to come out to fit it in.  Some more bricks are going to have to come out to do the window sill, but that's pretty obvious now.


And here's a picture of the frame for the verandah that I was talking about the other day.  See how at the house side, the frame is sitting on top of the roof frame to increase the pitch of the verandah roof.


Finished shed

The shed is finally finished.  Isn't it a beauty?  The walls are "pale eucalypt", the roof is "wilderness" and the roller doors, gutters and down pipes are "woodland grey".   The window frames and the tank are "rivergum", which is supposed to be the same as the roof colour "wilderness".  I don't know why Colorbond insist on changing the names of their colours every couple of years or so.  At least the colours are supposed to be the same, so you can still match stuff from other suppliers.  The photos don't really show the roof colour that well, so you'll just have to take my word for it.  :)


I spent at least an hour walking around the shed, picking up all manner of screws, bits of metal, rivets, etc.  Hundreds of them.  I think we've got enough to put together a whole other shed, if we had extra panels and frame bits.  They were strewn everywhere.  I expect if I went up there again and walked around the shed, I could find another 50 screws on the ground without trying too hard.  There were at least 50 just on the concrete out the front of the 3 bays with the doors.

The down pipes aren't on yet, because the guy who put the shed up is not licensed to connect them to the tank.  There are so many different plumbing licenses; I had no idea before we started all this.  The guy who did the septic tank needed a specific license for that and drainage.  The roof of the shed, because it is metal, needed to be done by someone with a roof plumbing license, but apparently, you can get a restricted roof plumbing license to be able to just do class 10A buildings; ie. garages and sheds.  That license doesn't give them the authority to connect to any drainage, whether that is a storm water drain or a tank.  We need to get a plumber with that license to connect the down pipes to the tank.  Brilliant.

Unfortunately, there was no ladder on site, so I couldn't see how much the shed imposed on the view out of the round window.  A photo opportunity for another day.

I finally got one after the plastering has been started.


Friday, 13 January 2012

Shed construction underway

The shed guys finally rang on Monday to say they were starting construction on Tuesday and if all went well, they hoped to be finished by Wednesday afternoon.  That was another reason for going up on Wednesday.  When I got up there, the frame was already up.

However, it was way too windy to put the roof on, on Wednesday.  They put most of the walls up and then left for the day.


That's my other reason for going up tomorrow.  They rang this morning to say it was finished.  With the shed finished, we will finally have a secure lock-up on site.  Not that we've had anything go walk-a-bout, but apparently there was a sticky beak who drove in last week-end, did a u-turn and then left.   The bricklayer asked if it was me, but it wasn't.  We hadn't been up since Boxing Day.  I wouldn't drive all that way to just turn around and leave straight away.  I know everybody knows everybody's business up there, so it was probably someone local who wanted a closer look.  You really can't see that much from the road.  Our site position on the block is fantastic.

Downstairs windows are in except for the laundry

Things are moving again after the Christmas break.  I went up on Wednesday to meet my independent inspector.  We got the invoice for the frame stage just after Christmas, so it was time to get someone in, independent of the builder, to check on the work completed so far.  Glad to say he didn't have anything too serious to report and I've forwarded his findings onto the builder for his feedback.

The downstairs windows have all been installed, except for the laundry window and when I look at the brickwork on the laundry, it looks to me like there are a few bricks that are going to need to be removed to fit it in.  Another email to the builder.


The brickwork is coming along.  Hard to believe it's just the one guy doing it all, but he's doing a brilliant job.  He said the downstairs walls might be finished by the week-end.  I'm going up to have a look tomorrow.

The verandah frame and posts are going up as well at the moment.  The verandah posts look great.  There was an issue with the pitch of the roof on the verandah and I thought the finished height of the verandah was going to have to drop, with the gutters ending up lower, but they've resolved the problem in a much better way by raising the edge of the verandah frame above the house walls.  A bit hard to explain, but it's a much better outcome than what I had expected.  I didn't capture that in a photo either, so I'll have to get one tomorrow.